On the Facebook group for Ham Radio Deluxe somebody had posted a link to a video highlighting a "bug" in soundcards that use a particular Texas Instruments audio chipset - the affected chipset is the TI PCM2900 series PCM2904 and below, pre-C revisions. See
here for Reddit article.
Some radios have this chipset built into them. My Yaesu FT450-D is
NOT one of them fortunately.
I had a look at the YouTube video
https://www.youtube.com/watch?v=guH0NMRRTAo and the poster John Sands had a lot of useful information including how to temporarily fix it if you have the chipset. There was a link to a freeware piece of software for a Peak Level Meter
darwooddesigns.co.uk/pc2/meters.html and on the Facebook page of HRD somebody linked to a Soundcard Oscilloscope
zeitnitz.eu/scope_en which can be used to check the waveform of your signals.
G8YPH Soundcard Usage
The PC connected to my various radios has 4 soundcards built into it:
- The internal onboard Dell soundcard is disabled in the BIOS
- A EMU-0404 PCI high spec professional soundcard - many input/outputs, ASIO, WAVE, Full MIDI, DSP configuration possible with this card - drivers up to Windows 7 64bit are only available for this now though. So Windows 8.1 and Windows 10 might not work.
- 2 x USB cheap soundcards (costing a few quid from Amazon)
The latter soundcards are the ones that I use for the Yaesu FT-450D as they are connected to a powered USB hub close by the rigs.
The only issue I had to resolve with these sound cards are that they are not shielded. I added some domestic aluminium foil around the body and loosely connected it to the ground/earth of the USB plug. This simple modification worked very well and the dongle does not pickup any stray RF at all.
A long term modification would be to replace the aluminium with self adhesive copper foil wrapped around the case with a soldered connection to the ground. However for the time being the aluminium works well.
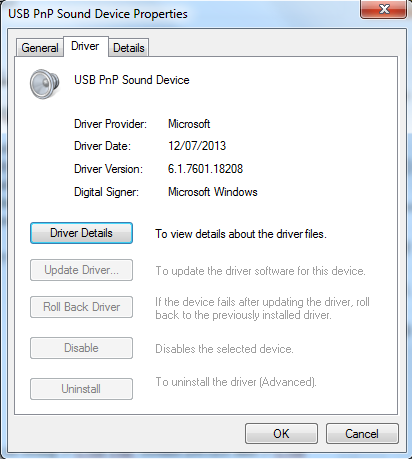
The sound card automatically picks up the necessary drivers from Microsoft's Windows Update site and the driver it uses is:
- USB PnP Sound Device
- Driver Provider: Microsoft
- Driver Date: 12/07/2013
- Driver Version: 6.1.7601.18208
- Digital Signer: Microsoft Windows
 |
| General Tab |
 |
| Driver Tab |
 |
| Driver Details |
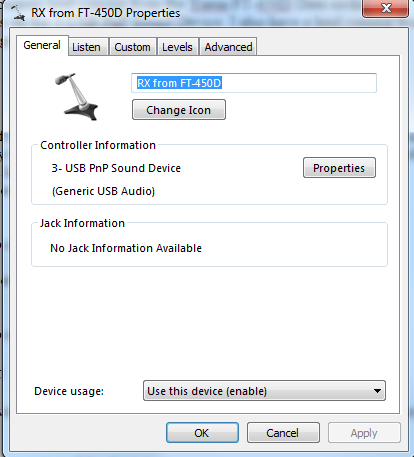
The controller information field shows up my cards as being 3-USB PnP Sound Device and 5-USB PnP Sound Device (Generic USB Audio)
If you plug the device into a different USB socket it will pickup a different number.
Naming sound cards
 |
| Recording Device Naming |
 |
| Playback Device Naming |
It's always a good idea to name any devices you have in Windows from the defaults ones. It aids signal tracing later on.
I have named my devices as this:
3-USB PnP Sound Device -
from now on known in the blog as Soundcard #3
- Recording - RX from FT-450D
- Playback - TX to FT-450D
5-USB PnP Sound Device -
from now on know in the blog as Soundcard #5
- Recording - FT-450D Headphone Socket
- Playback - NOT IN USE - I don't use this currently for anything.
The 3.5mm (1/8") plugs on the custom lead coming from the Yaesu FT-450D Data socket are plugged into the relevant sockets on the 3-USB PnP Sound Device. I also have a lead coming from the headphone socket of the rig going to the recording socket of the 5-USB PnP Sound Device.
Sound Card Levels
As the input and output levels of the FT-450D data socket are fixed then you have to resort to using the digital attenuator supplied by the driver to the sound card. Fortunately the input and output of the rig are matched (impedance and line level) to the typical computer soundcard.
On Soundcard #3 I have the following for the "Recording" settings:
 |
General Tab
This is where you change the name of the device and
change its icon |
 |
| Listen Tab |
 |
NOTE AGC on the Custom Tab is disabled
|
 |
| Levels Tab |
 |
| Advanced Tab |
For the Soundcard #3 "Playback" settings I have this
 |
General tab
I have renamed it to something meaningful |
 |
Levels tab
63% seems to work well for me
ALC is controlled from within DM780 itself
as seen in another of my blog posts |
 |
Enhancements tab
Nothing is selected here and left at default |
 |
Advanced tab
Again nothing is changed here |
On Soundcard #5 I have the following settings for the "Recording" settings :
 |
General tab
Note I have changed the Icon to a set of headphones |
 |
Listen tab
The "Listen to this device" checkbox is ticked
see further down for details |
 |
| NOTE AGC on the Custom Tab is disabled |
 |
| Level Tab |
 |
| Advanced Tab |
I don't use the playback section of the Soundcard #5 so haven't included it.
Monitoring the rig output
I have the recording input of device 5 set to playback through the default playback device - in my case the EMU-0404
To do this:
In the Sound manager open the properties of the device
- go to the Listen tab
- check the Listen to this device box
- make sure the Default Playback Device is selected
- Click OK twice.
You can then listen to the output of the the FT450D through the shack speakers and control the level using the AF Gain control on the rig (or control that with HRD Rig Control)
Monitoring sound card output
The Digital Level Meter software from darkwooddesigns.co.uk can be configured to monitor the
input level of any of your sound cards.
I set mine to monitor Soundcard#3 microphone socket - this is connected to the rig data output socket. I tuned to a typical busy position of the 20m band which has a lot of activity - 14.070 MHz USB the PSK portion.
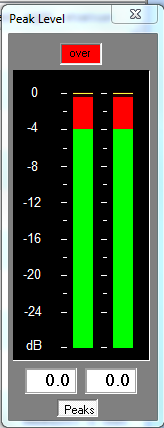
As the level of the digital attenuator is set to 49% I get peaks of around -3.8dB and an average of -8dB which is just less that the software overload position.
 |
| A good peak level |
I turned the attenuator up to 100% (so it wasn't doing anything) and immediately went into the red peaking at 0db - and flashing OVERLOAD - which I would have expected. This was also verified in the DM780 module too as everything was saying OVERLOAD
 |
| Bad peak level |
As there was no way of turning down what is coming from the rig the only alternative is to activate the digital attenuator on the soundcard. This is not an ideal but the only thing I have.
I turned the attenuator back to 49% and all was well.
Using a digital oscilloscope to check the waveform for clipping.
The Soundcard Oscilloscope software can be used to check any permutation of soundcard within a PC. I had a look at the waveform of the signal on the Soundcard#3 microphone socket.
When set at 49% the signal was pure and smooth. When increased to 70% the peak level meter was just peaking into Overload also confirmed with DM780. The waveform on the Oscilloscope was also starting to clip.
I increased the level to 100% and the waveforms were continually clipping.
So I decreased the level back to 49% again and all returned to normality.
I think that level works well for me although I don't currently operate any of the JT65 or JT65-HF weak signal modes. These modes need your sound card set for optimum levels and the two pieces of software I highlighted can help in setting your station up to operate these modes.
Monitoring Sound Card Input,
It's always nice to see the signal that your PC is generating is at a good level and isn't introducing distortion into the start of the signal chain.
The Software Oscilloscope can be used to monitor the signal both coming from the computer and into the soundcard feeding the rig.
 |
In my case I chose Loopback: TX to FT-450D
(aren;t you glad you named the soundcards earlier on!) |
You can compare the waveform and make the necessary level adjustments.
 |
| A fairly smooth waveform being fed into the sound card |
Conclusion
It is easy to monitor the levels and waveforms of digimode audio both going in and coming out of your rig using a few simple freeware programs. You can then make sure you are making the most of your computer by obtaining the cleanest possible audio signal.